NHM Microscope Slides - Mass Digitisation
Table of contents
Overview
This page outlines the semi-automated mass digitisation workflow used by the Natural History Museum, London, to digitise its microscope slide collection. It provides a short summary of the workflow developed as part of the SYNTHESYS and ICEDIG projects, with more detail to be found in the Novel Automated Mass Digitisation Workflow for Natural History Microscope Slides paper (Allan et al., 2019).
Workflow
Pre-Digitisation Curation 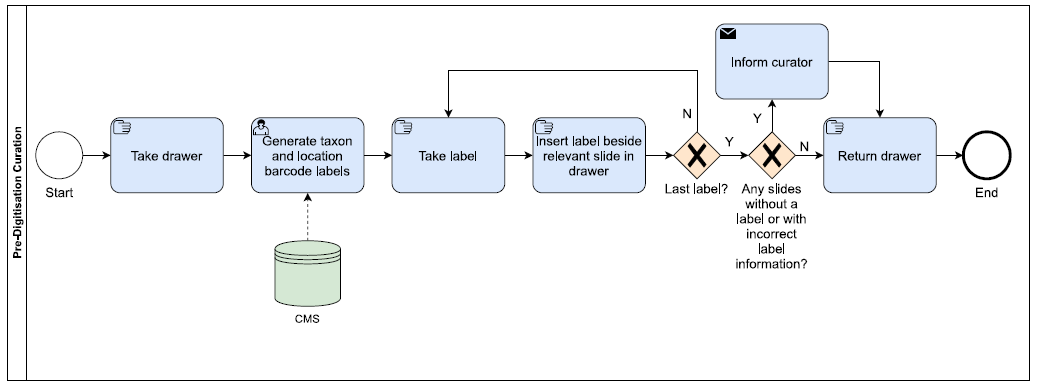 The workflow above shows the steps taken in the pre-digitisation curation stage:
- Drawer location and taxon barcode labels are printed from the Museum’s Collection Management System (CMS) (Figure 1a).
- These are then temporarily inserted into the collection (Figure 1b).
- If there is no label for a taxon, or the label information is incorrect, this information is passed to the curator to update the CMS.
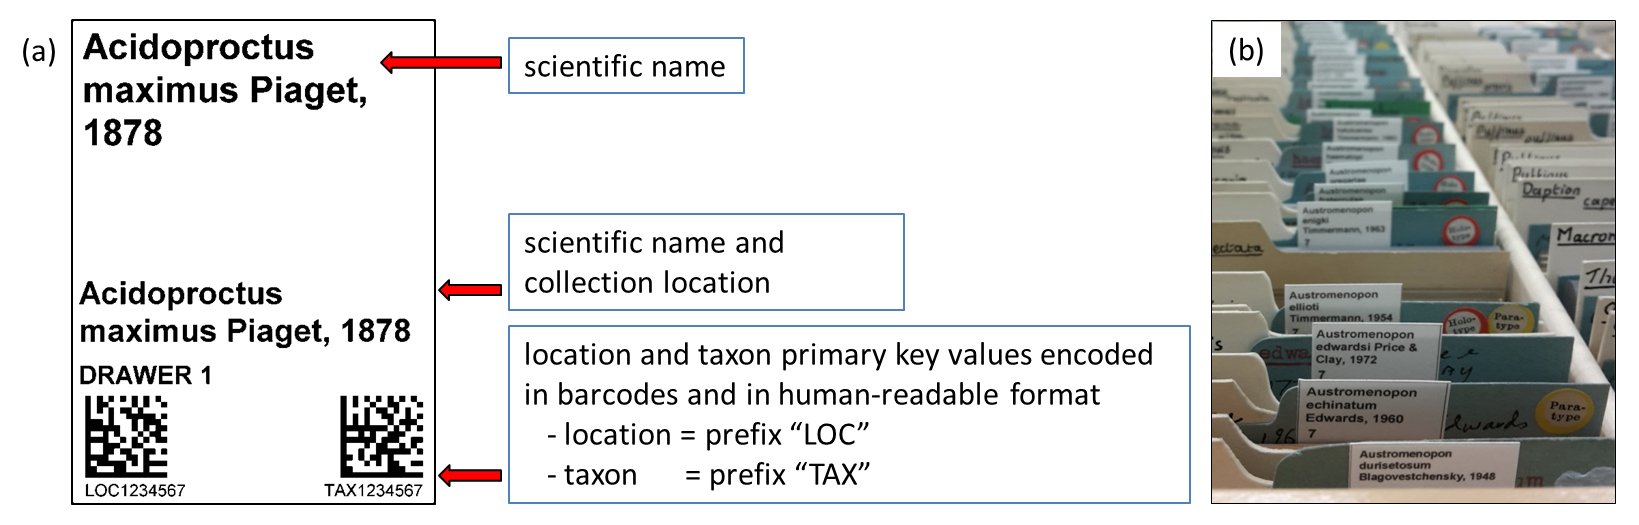 Figure 1: a) Shows the drawer location and taxon barcode labels that are printed from the Museum’s Collection Management System b) Shows how these temporary labels are inserted into the collection (Allan et al, 2019).
Image Capture 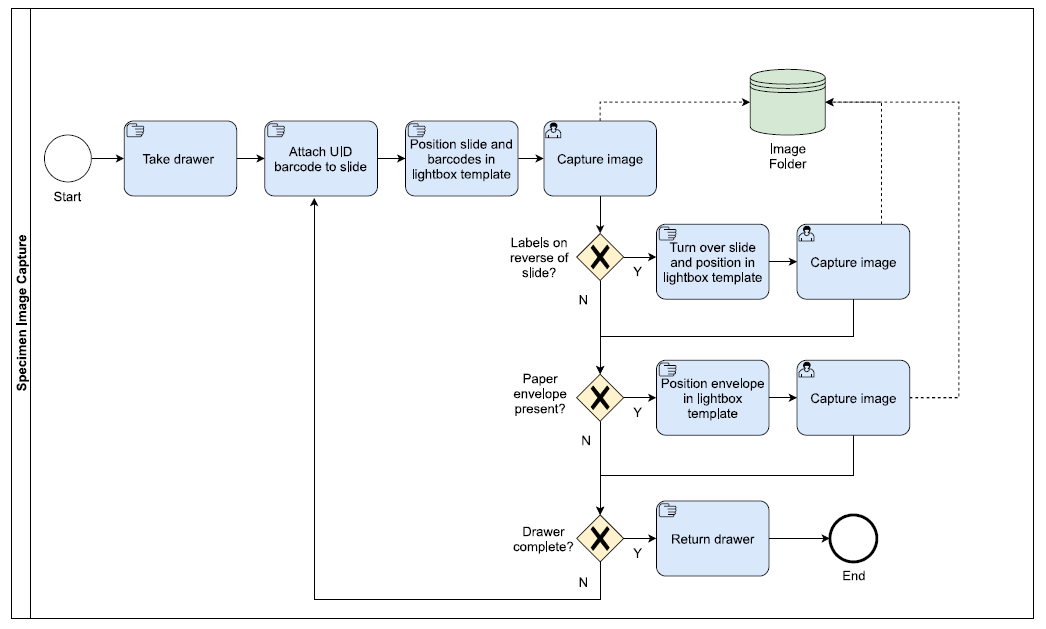 The workflow above shows the image capture steps:
- Using forceps, the Unique Identifier (UID) barcodes, which are printed on a self-adhesive 5 x 6mm labels, are attached to the glass of the slide, on the upper side of the slide.
- The slide is then placed in a predefined position in the imaging template, which is fixed in position within a custom-built lightbox. More information on the lightbox set-up can be found in Requirements.
- Next, the temporary barcode label(s) encoding the drawer location and taxon information are placed in the imaging template in a predefined section. Other labels encoding information, such as type status, can also be included.
- If specimen labels are present on the reverse of the slide, it is turned over and a second image captured. Some slides are housed in a paper envelope with additional information. In these cases the envelope is placed in the template and an additional image captured. For slides where information has been written with a diamond pen, a black piece of paper is placed underneath the text to enable it to be visible.
- The slides is returned to the drawer and the process repeated with the next slide changing the barcode labels for drawer location, taxon etc as required.
- Metadata associated with the image (e.g. copyright) is automatically added to the file during image capture using EOS Utility.
Image Processing & Electronic Data Capture 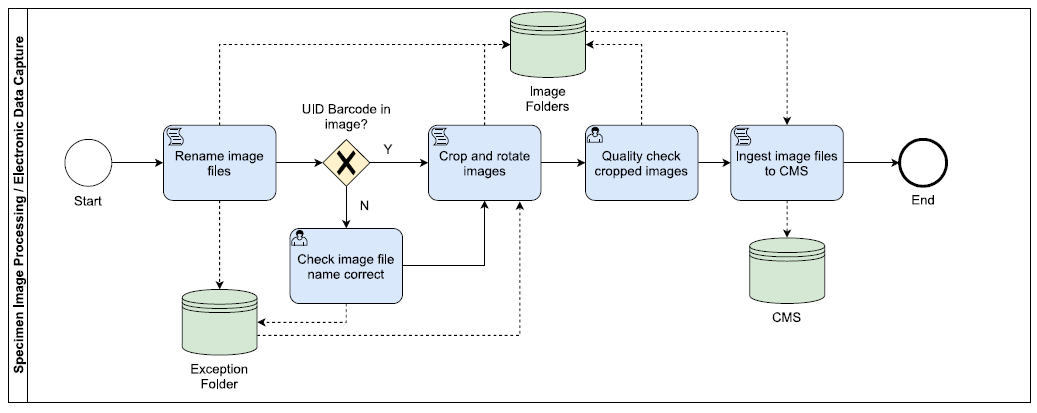 The workflow above shows the image processing and electronic data capture stages, with most of this process being semi-automated:
- File renaming - BardecodeFiler reads the multiple barcodes in the image, then, following predefined rules within the software, it renames the image files using the encoded information before saving the image files in an ‘output’ folder. For images without UID barcodes (i.e. envelope images, reverse slide images), the image file is renamed using the previously read UID barcode and saved in an ‘exceptions’ folder, where quality checks can be carried out.
- Image processing - XnConvert is used to rotate the images 180 degrees, as the camera and the imaging system are in opposite orientations, and to crop out the barcode labels for drawer location, taxon etc. The image files are then saved in a ‘cropped’ folder.
- At the end of an imaging session, the image files in the ‘exceptions’ folder are checked for issues, such as slides being imaged without UIDs having been added, before being rotated and cropped using XnConvert’s batch processing.
- All image files are then quality checked using Excel macros and manual checks, if required.
- The image files are then ingested into the CMS using various scripts as follows: 1) for specimens that do not yet have a record in the CMS: a new specimen record is created using the UID, drawer location and taxon information encoded in the image file name, to which the image file (CMS multimedia record) is then attached; 2) for specimens with existing records in the CMS: the corresponding specimen record is identified using the UID, to which the image file (CMS multimedia record) is then attached.
The use of hot folders and automated processes enables imaging and processing to happen simultaneously i.e. the ‘image capture’ folder is watched by BardecodeFiler, while the ‘output’ folder is watched by XnConvert. More information on all these steps can be found in the Novel Automated Mass Digitisation Workflow for Natural History Microscope Slides paper (Allan et al., 2019).
Example Projects
Phthiraptera
This workflow was piloted at the Natural History Museum, London, in order to digitise our Phthiraptera lice collection, which consists of ~70,000 slides. The table below shows the digitisation rates achieved during this project (Allan et al., 2019).
Table: Estimates of digitised slides per person per day (Allan et al., 2019).
| Digitisers (focused testing*) | Digitisers (real world) | |
|---|---|---|
| Min (a) | 476 | 370 |
| Max (b) | 1103 | 1006 |
| Median (m) | 741 | 700 |
| Base rate (a+4m+b)/6 | 757 | 696 |
| Standard Deviation (b-a)/6 | 105 | 106 |
| Error Rate | 0.006 |
*focused testing shows the rate when only digitisation activities are occurring, which is unlikely to be achieved in every day work due to meetings and other interruptions
Natural History Museum, London: Adaptations to the pilot workflow
The following changes have been made to the pilot workflow:
Pre-Digitisation Curation: In addition to the barcode labels for drawer location and taxon, we now include labels encoding type status and, where possible, high level locality information, such as country, island or similar (Figure 3).
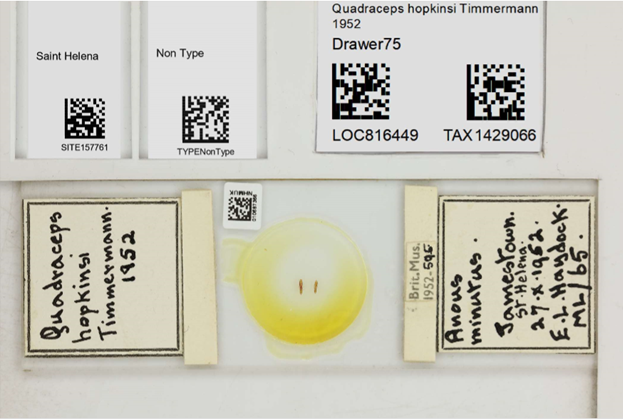
Figure 3: Shows the updated microscope slide imaging template that can include the following barcode labels: high level collecting locality, type status, drawer location and taxon.
Image Processing: We now have an Excel macro that can be used at the end of an imaging session to automatically check the image filenames for a range of data quality issues, including UID discrepancies, thus enabling better quality assurance.
Requirements
Hardware
- 1 x Canon EOS 5DS R with Tamron 90mm Lens, vertically mounted
- 1 x 32 W Circline VLR Full Spectrum Vita-Lite 5500 K fluorescent ring bulb
- 1 x custom-built lightbox (Figure 4a)
- 1 x imaging template (made with durable white plastic, with raised ‘L-shaped’ edge to ensure slides can be positioned in same location) (Figure 4b).
 Figure 4: a) Shows the imaging set-up: vertically mounted DSLR camera, lightbox and slide imaging template. b) Slide imaging template with raised ‘L shaped’ edge. The slide is positioned at this edge, and there is a grooved area to place the drawer location and taxon barcode labels (Allan et al., 2019).
Software
- EOS Utility
- BardecodeFiler
- XNConvert
Camera Settings
| Make and model | Image settings |
|---|---|
| Canon 5DS R | f 1/5.6; ss = 1/80 sec; ISO = 200. |
Microscope Slide Barcode Specification
- Base material: 8100M Matt White Polyester
- Ink: Resin ink (thermal transfer)
- Adhesive type: Permanent solvent acrylic
- Dimensions: H=5.00mm W=6.00mm Radius Corners=0.50mm
- Barcode: 9 digit sequential numbers printed as a Datamatrix code
Other Sources
Papers
Novel Automated Mass Digitisation Workflow for Natural History Microscope Slides
Blogs and Articles
Digitising the louse collection: we’ve been itching to tell you more
Authors
Lisa French, Larissa Welton, Louise Allan, Louise Berridge, Laurence Livermore
Natural History Museum

Contributors
Authors are those who directly prepared this guide, however this workflow builds upon the working practices and insights of numerous colleagues over many years, particularly Ben Price, Olha Shchedrina and previous members of the digitisation team (Natural History Museum)
References
Allan, E.L., Livermore, L., Price, B.W., Shchedrina, O., & Smith, V.S. (2019). A Novel Automated Mass Digitisation Workflow for Natural History Microscope Slides. Biodiversity Data Journal 7: e32342. https://doi.org/10.3897/BDJ.7.e32342
Citation
French, L., Welton, L., Allan, L., Berridge, L. & Livermore, L. (2022) DiSSCo Digitisation Guide: NHM Microscope Slides - Mass Digitisation. version 1.0. Available at: https://dissco.github.io/MicroscopeSlides/MicroscopeSlide.html
Licence
Document Control
Version: 1.2
Changes since last version: Updates to workflow description
Last Updated: 2 August 2023
Edit This Page
You can suggest changes to this page on our GitHub