Adobe LightRoom - NHM Workflow
Overview
This page provides step-by-step instructions on how we use Adobe Lightroom at the Natural History Museum, London in our Herbarium Sheet Digitisation workflow.
Step by Step
Specimen Image Capture
We use a number of programs alongside Adobe Lightroom to take and process the herbarium sheet images. There are 4 windows open on our computer screen:
- Adobe Lightroom Classic.
- Windows explorer - set to the folder where you import images from the camera.
- Panasonic Lumix tethering program.
- A live view window - approximately similar to the camera’s LCD display showing a live feed of what the camera is seeing.
First, make sure that the camera is on and connected to the computer via a cable. To link the camera and the computer, once the camera is on select the PC (Tether) option from the USB mode menu.
 \
\
Figure 1: Select the PC(Tether) option (highlighted).
We arrange the four windows like this:
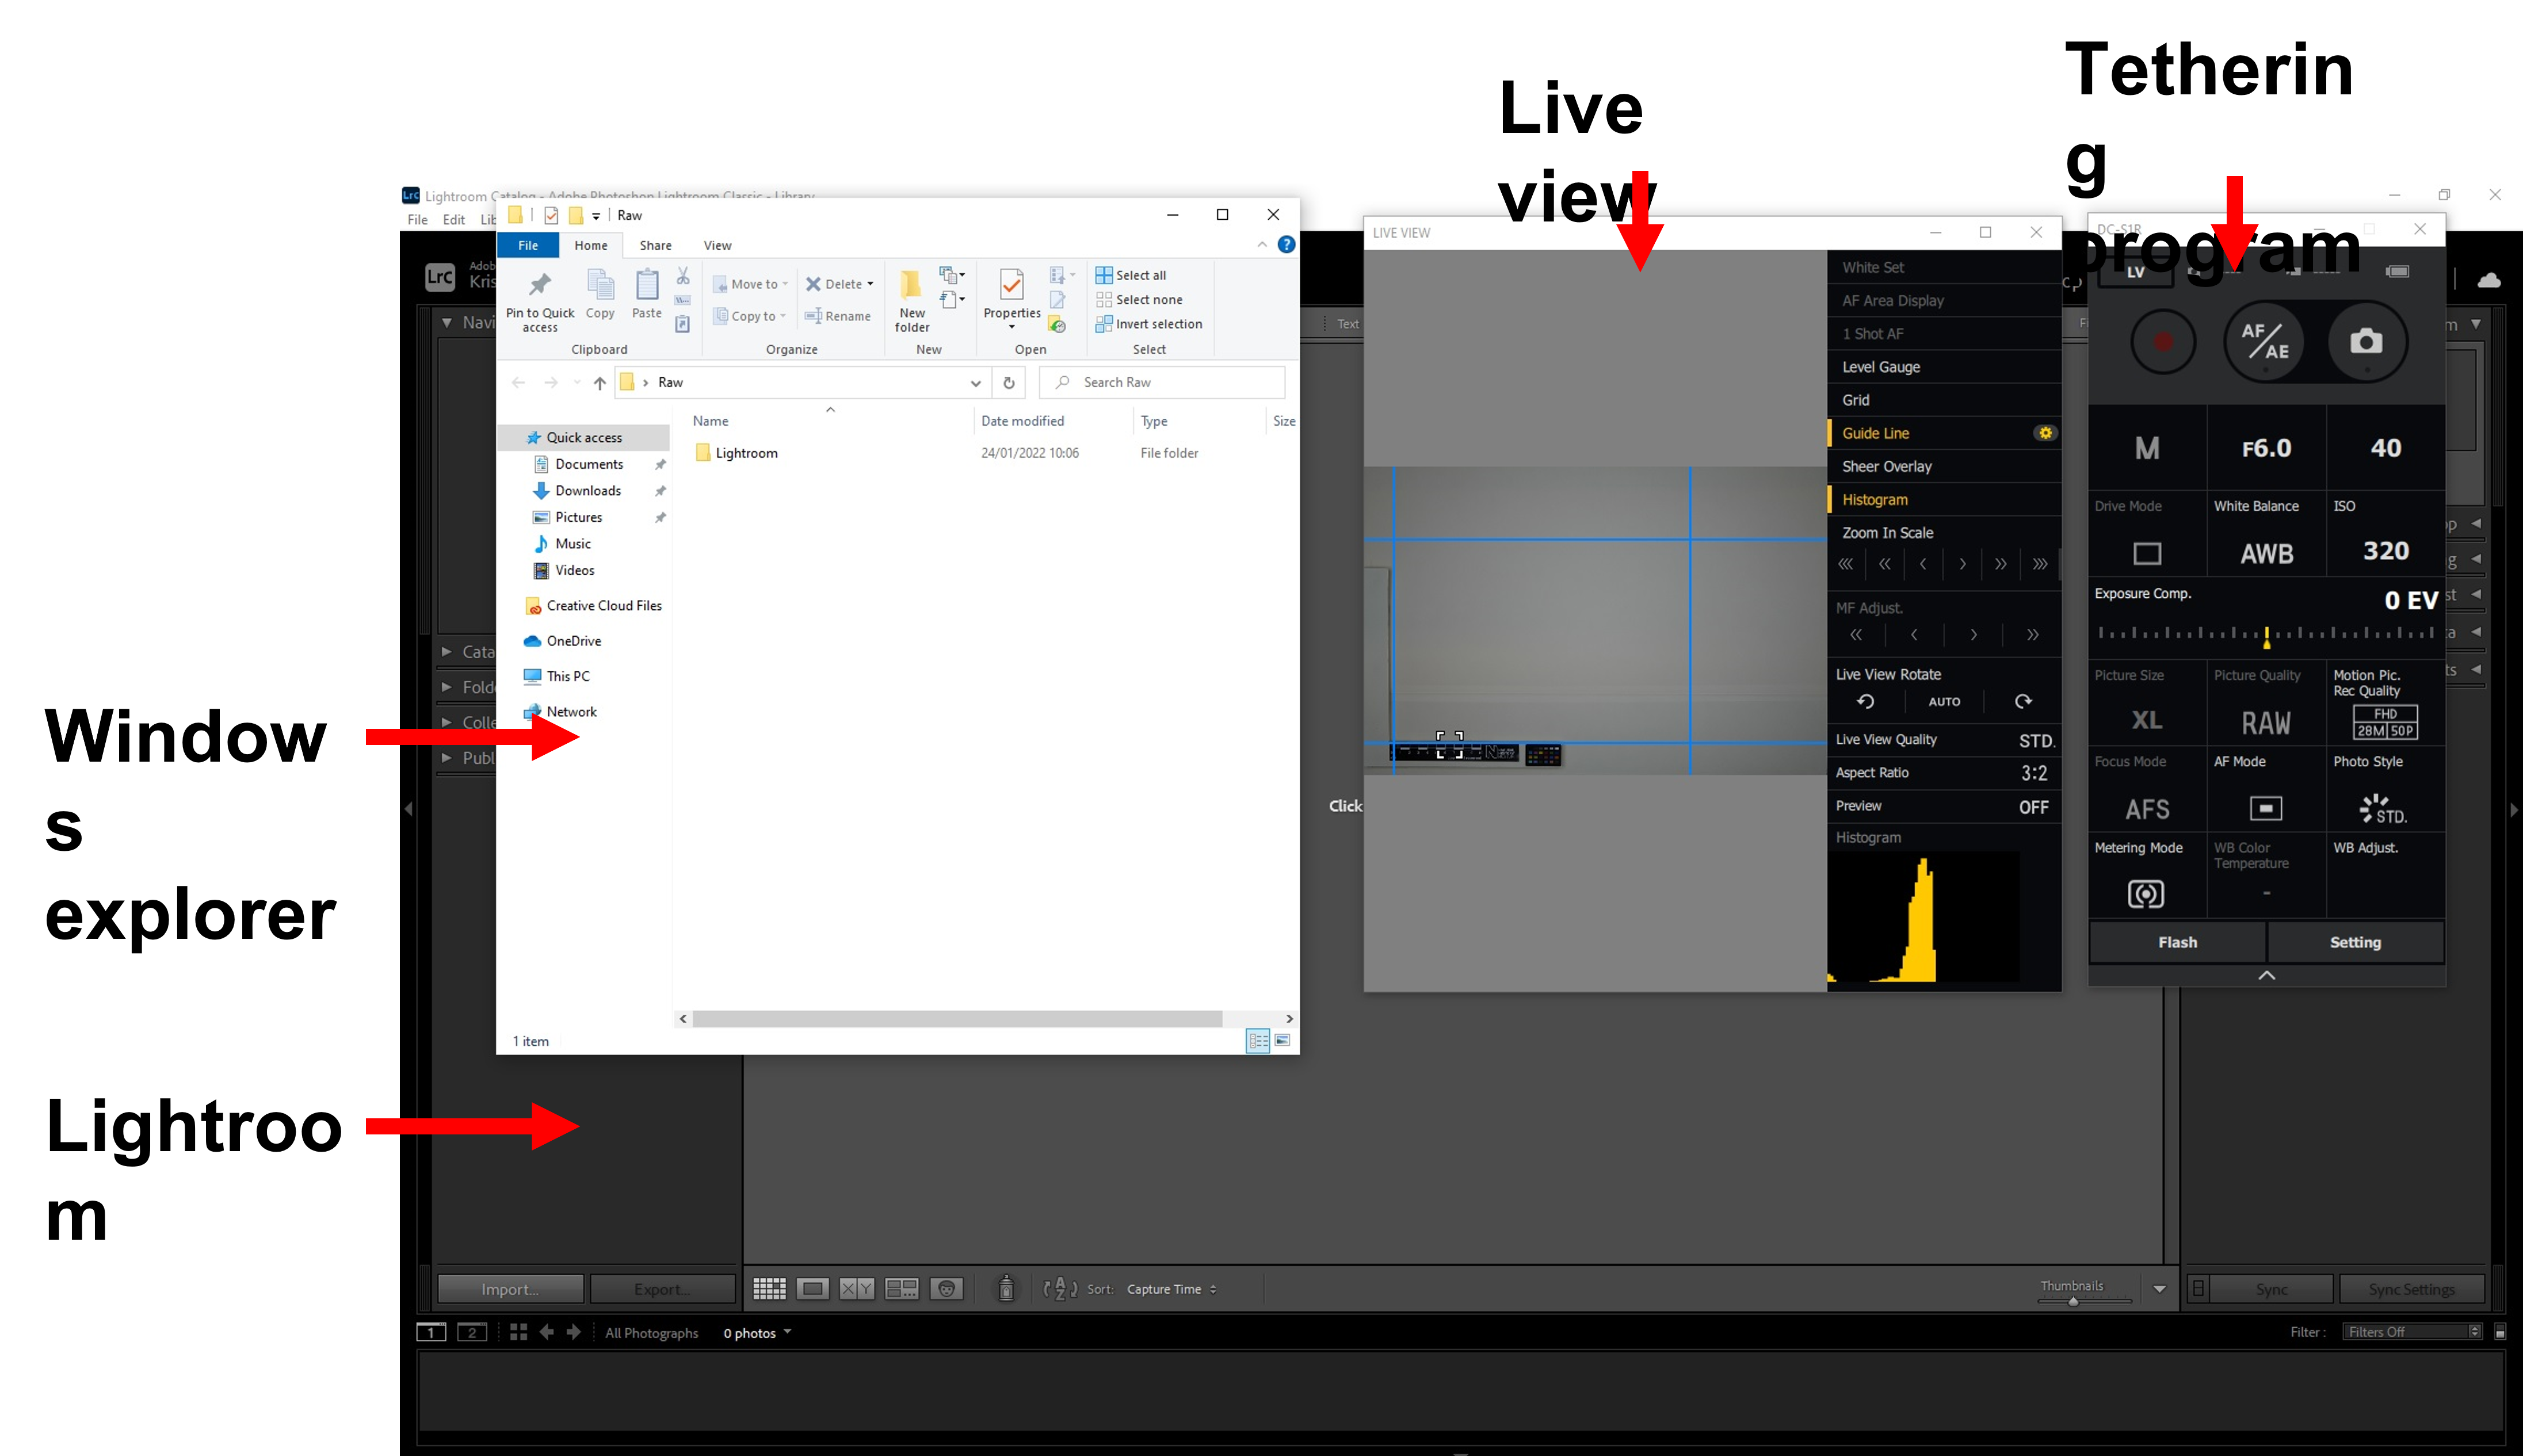
Figure 2: arrangement of four open windows used in this workflow.
The Panasonic tethering program enables us to interact with and control the settings on the camera directly. There are settings for ISO, shutter speed, and aperture. The level of these settings depends on the light source used.
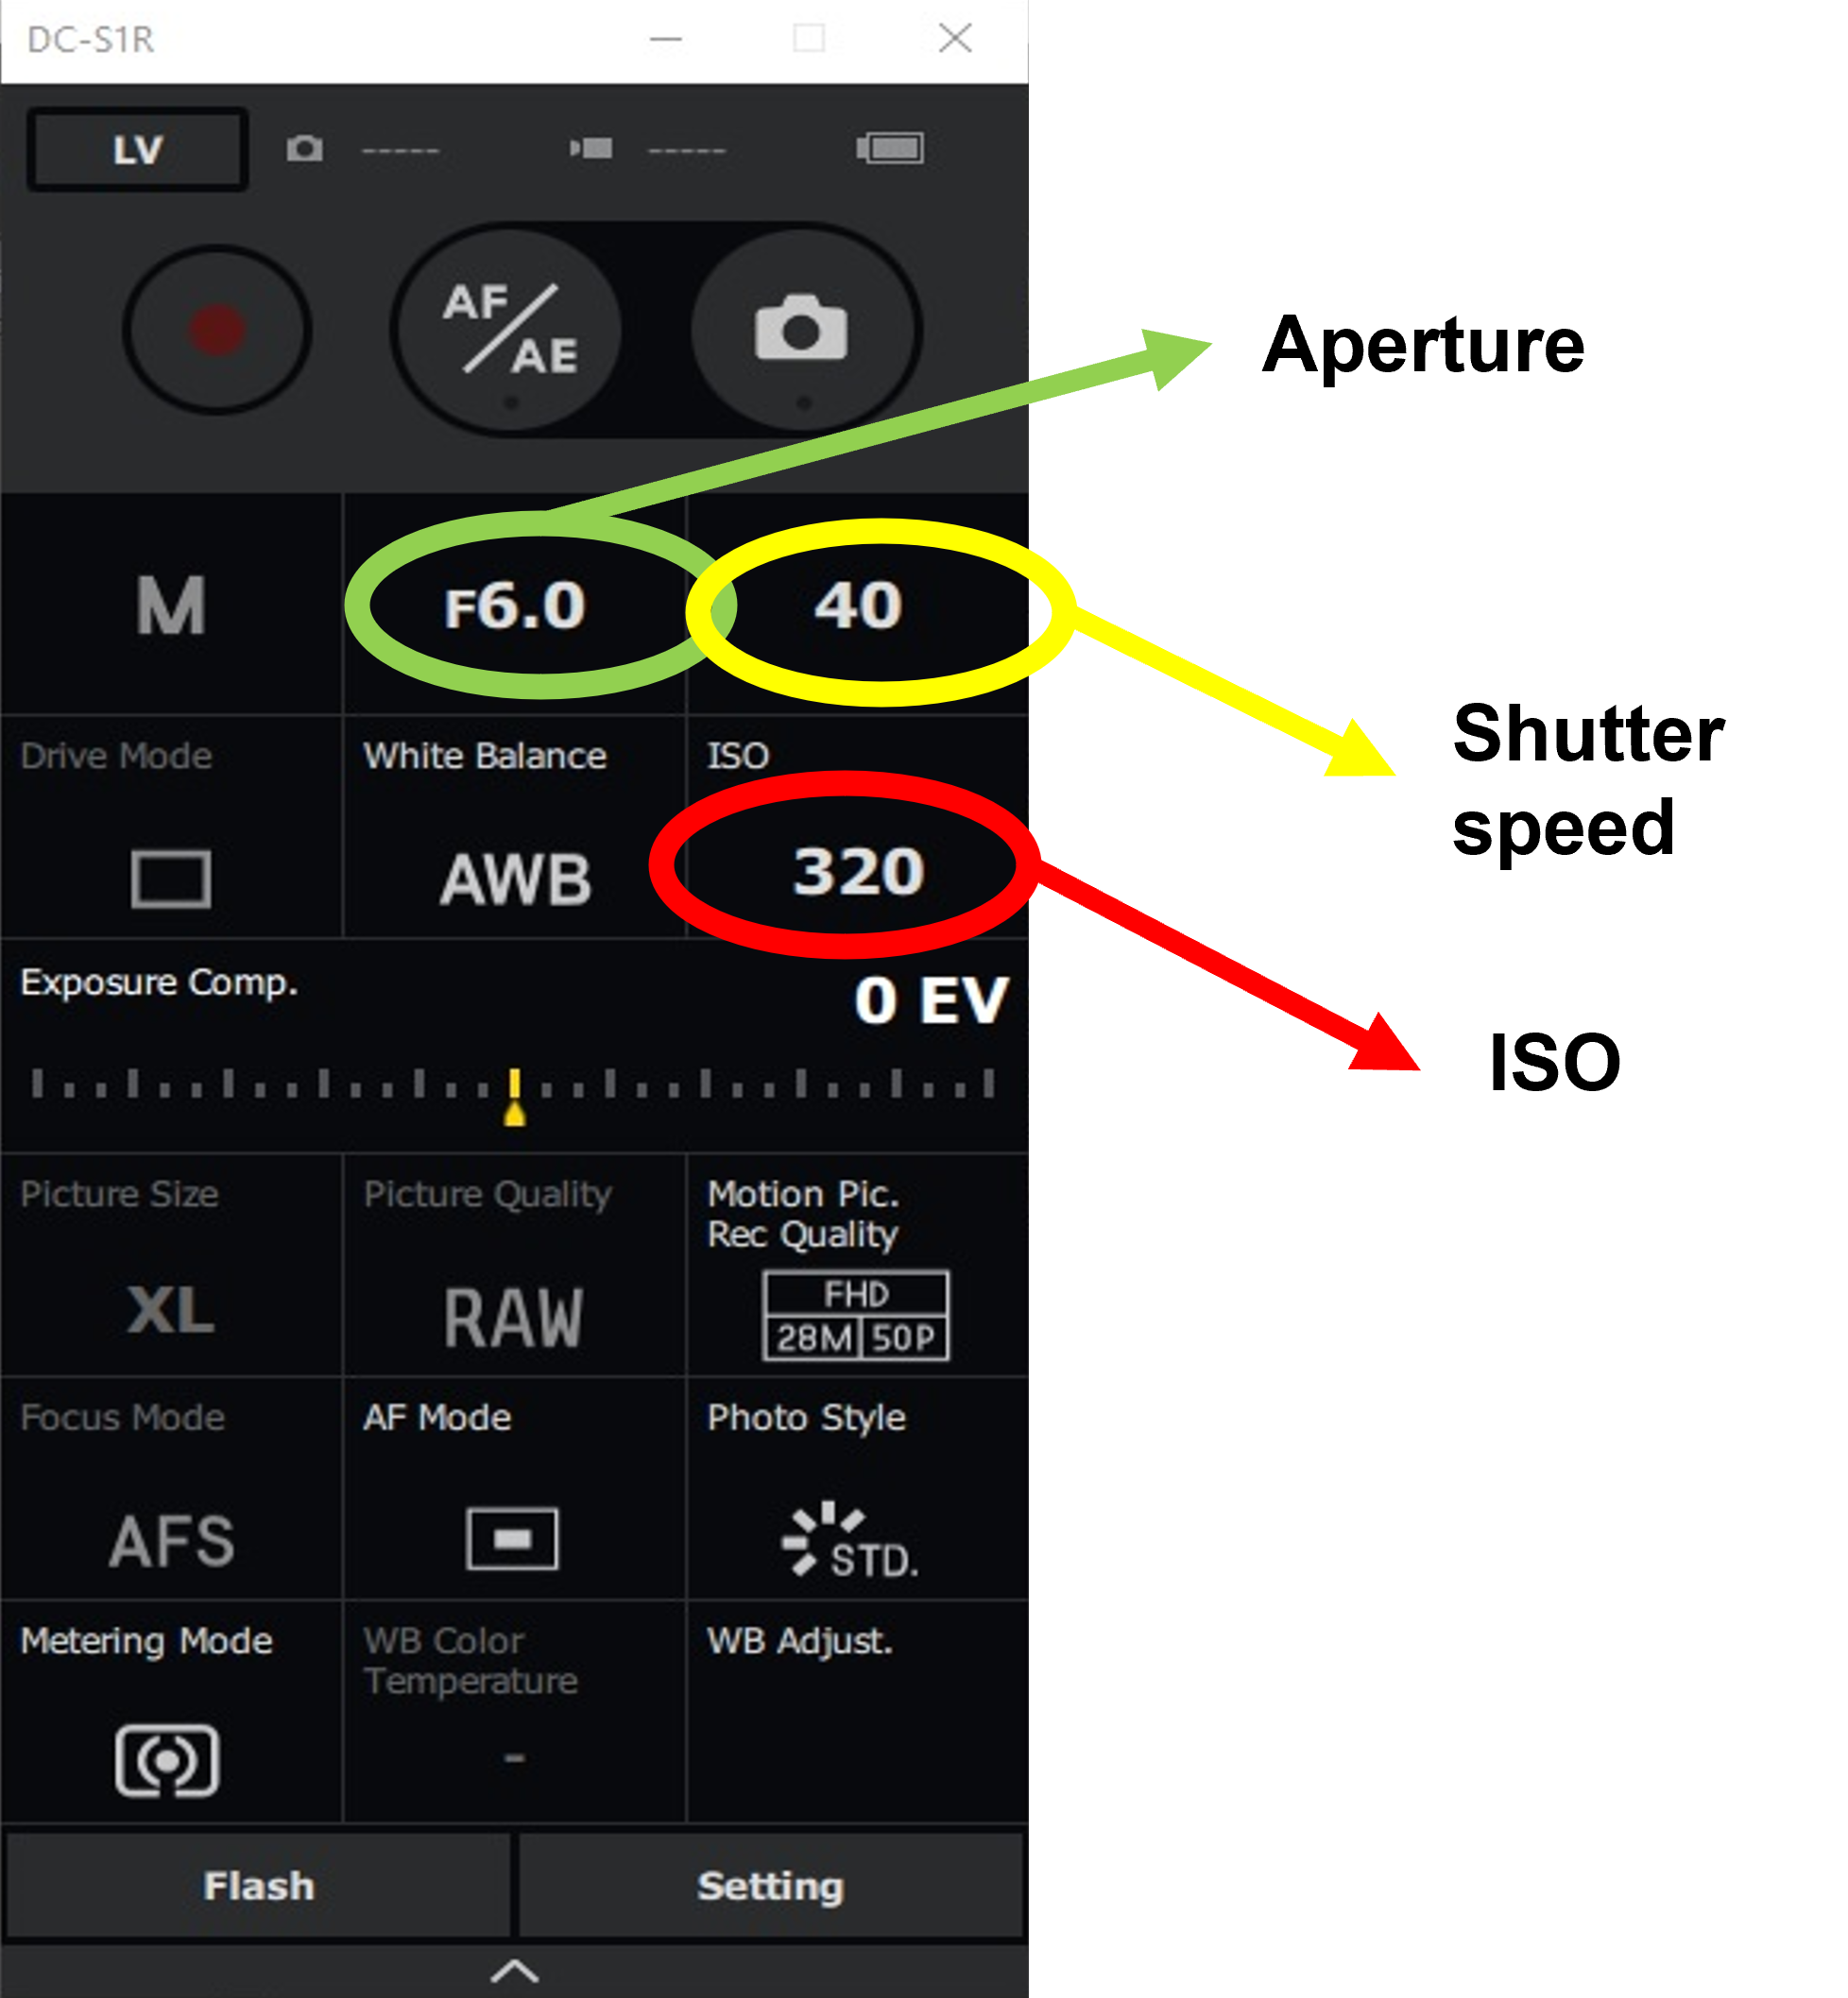
Figure 3: Close up of the Panasonic tethering window with exposure settings.
If using fluorescent lighting the settings are: ISO = 320; shutter speed = 1/40; aperture = f/6. If using LED lighting the settings are: ISO = 200; shutter speed = 1/60; aperture = f/6.5.
Set the ‘picture quality’ option to RAW.
Go to settings and set the ‘import folder’. This is where images will be imported too.
Use the ‘LV’ button in the top left to open the live view.
Adobe Lightroom settings. First either:
- Download the auto import settings for Lightroom or
- Create your own auto settings. For help with doing this try this guide from Adobe.
To load and set up your automatic presets: First, go to ‘File’ -> ‘Import Develop Profiles and Presets’ and select the preset file. Ours is called ‘Lumix-lightbox-1’.
Next, go to ‘File’ -> ‘Auto Import’ and tick ‘Enable Auto Import’
Then go ‘Auto Import settings’. Here select the ‘Watch Folder’. This is the folder where Lightroom will monitor for new files, import them to Lightroom and will apply pre-sets. We set this to a subfolder within the one in which we import our images from the camera.
At this stage, you can also add additional information using the ‘Metadata’ option. We add copyright information to our images in the ‘IPTC Copyright’ section stating that copyright is held by the ‘Trustees of the Natural History Museum, London’
Once this is completed, we are ready to begin imaging.
Now take the photograph by either: clicking the camera icon in the tethering program, or pressing the space bar.
The camera takes several photos which will be heard as several clicking sounds. It then stiches these together to form one complete image. This can take a bit of time depending on your computer.
The image will appear in your windows explorer window. It will be given a generic image name. We want to change this to a unique file name using the specimen’s barcode.
Highlight the image file, and then use the barcode scanner to read the barcode on the specimen sheet (usually in the top right corner). This will rename the image file. This does not require additional software other than the driver associated with the scanner.
 Figure 4: before (left) and after (right) file renaming using the barcode scanner.
Now move the file into the Lightroom folder. This is the folder which Lightroom monitors for new files and applies preset edits too. The file will appear in Lightroom and presets will be applied.
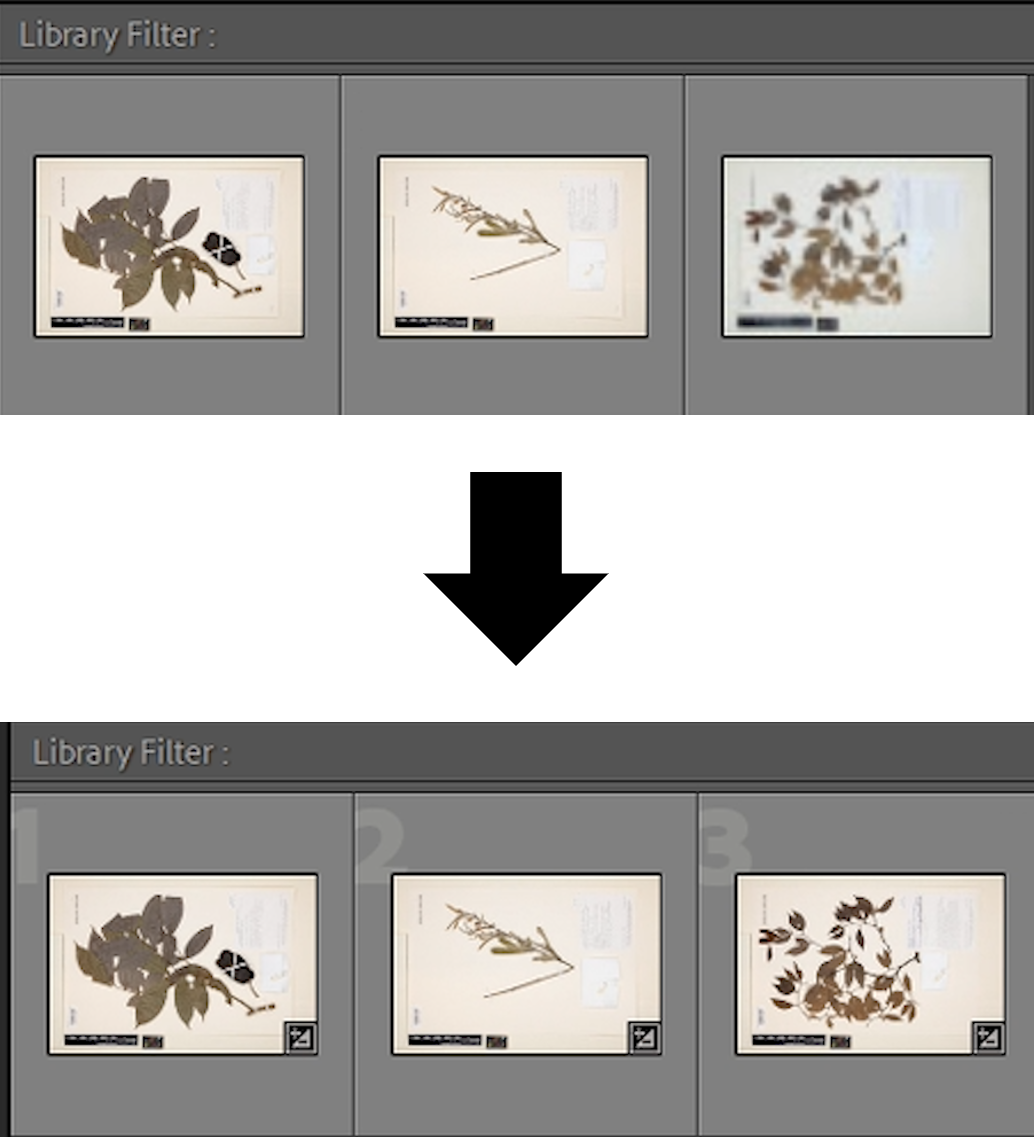
Figure 5: image before and after presets are applied. This shows three images in Lightroom. The third images changes between the top and the bottom as the presets are applied. The icon in the bottom right corner indicates that the image has been edited.
Remove the blue tack from the sheet, and carefully remove the specimen from the imaging station.
Specimen Image Processing
Once you have taken images of all your specimens for the day, there are a number of final steps required before the images are ready to be linked with their digital records and to be published and shared. These steps are:
- Rotating images.
- Cropping
- Exporting
This processing is performed in Lightroom. Check that the number of images in Lightroom is equivalent to the number of specimens that you have processed. Also check that the automatic edits to white balance and colour have been performed for each image. If there is an issue it is best to work this out now before proceeding.
Rotate images We rotate our images so that the top of the sheet is at the top of the screen.
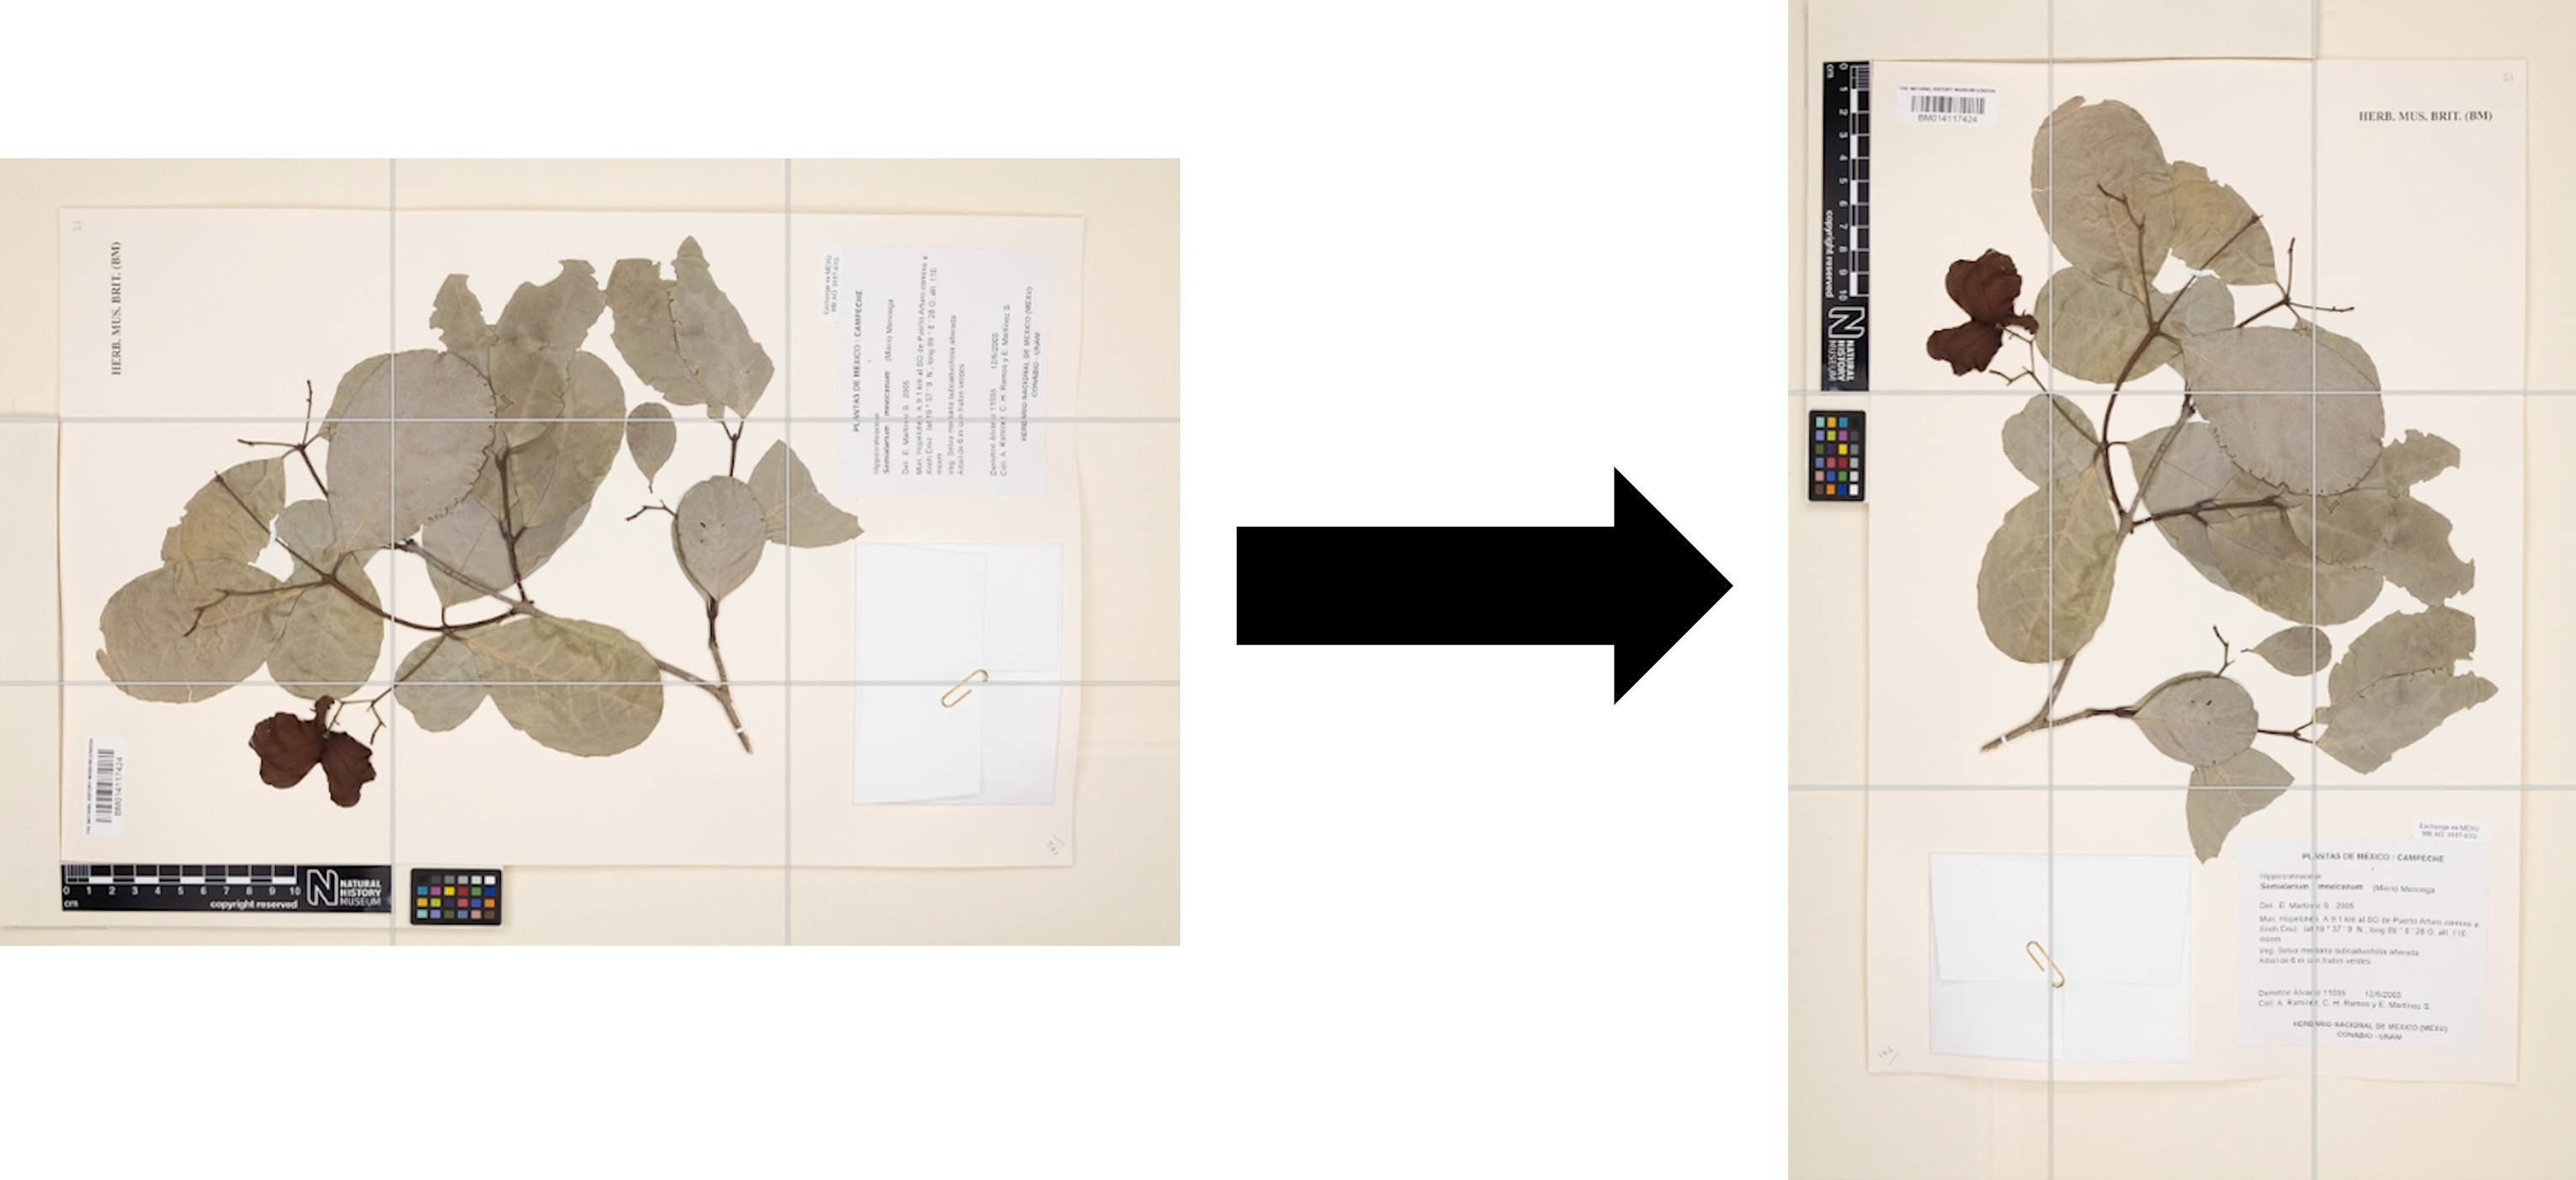 ! Figure 6: rotate images to the right.
This is done by highlighting all the images we have in Lightroom, and then right clicking on one of them and choosing the option ‘rotate right’. A popup notification will appear also informing you as to the number of images that have been rotated.
Cropping We now crop our images. This is to remove the extra space at the top and bottom of the image which does not include any of the herbarium sheet. This focuses the image on the specimen, partially reduces file size, and standardises the dimensions of the image.
Cropping is performed by first selecting the ‘Develop’ tab in the top right. This enlarges the first image. On the right, now select the aspect option, and change this from ‘Original’ to ‘5x7’.
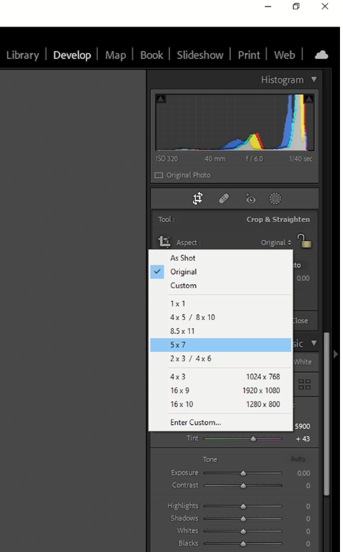
Figure 7: Partial screen shot of the Lightroom screen with aspect sizing options menu.
To apply this to all images, click the ‘Sync…’ button in the bottom right. That brings up this screen:
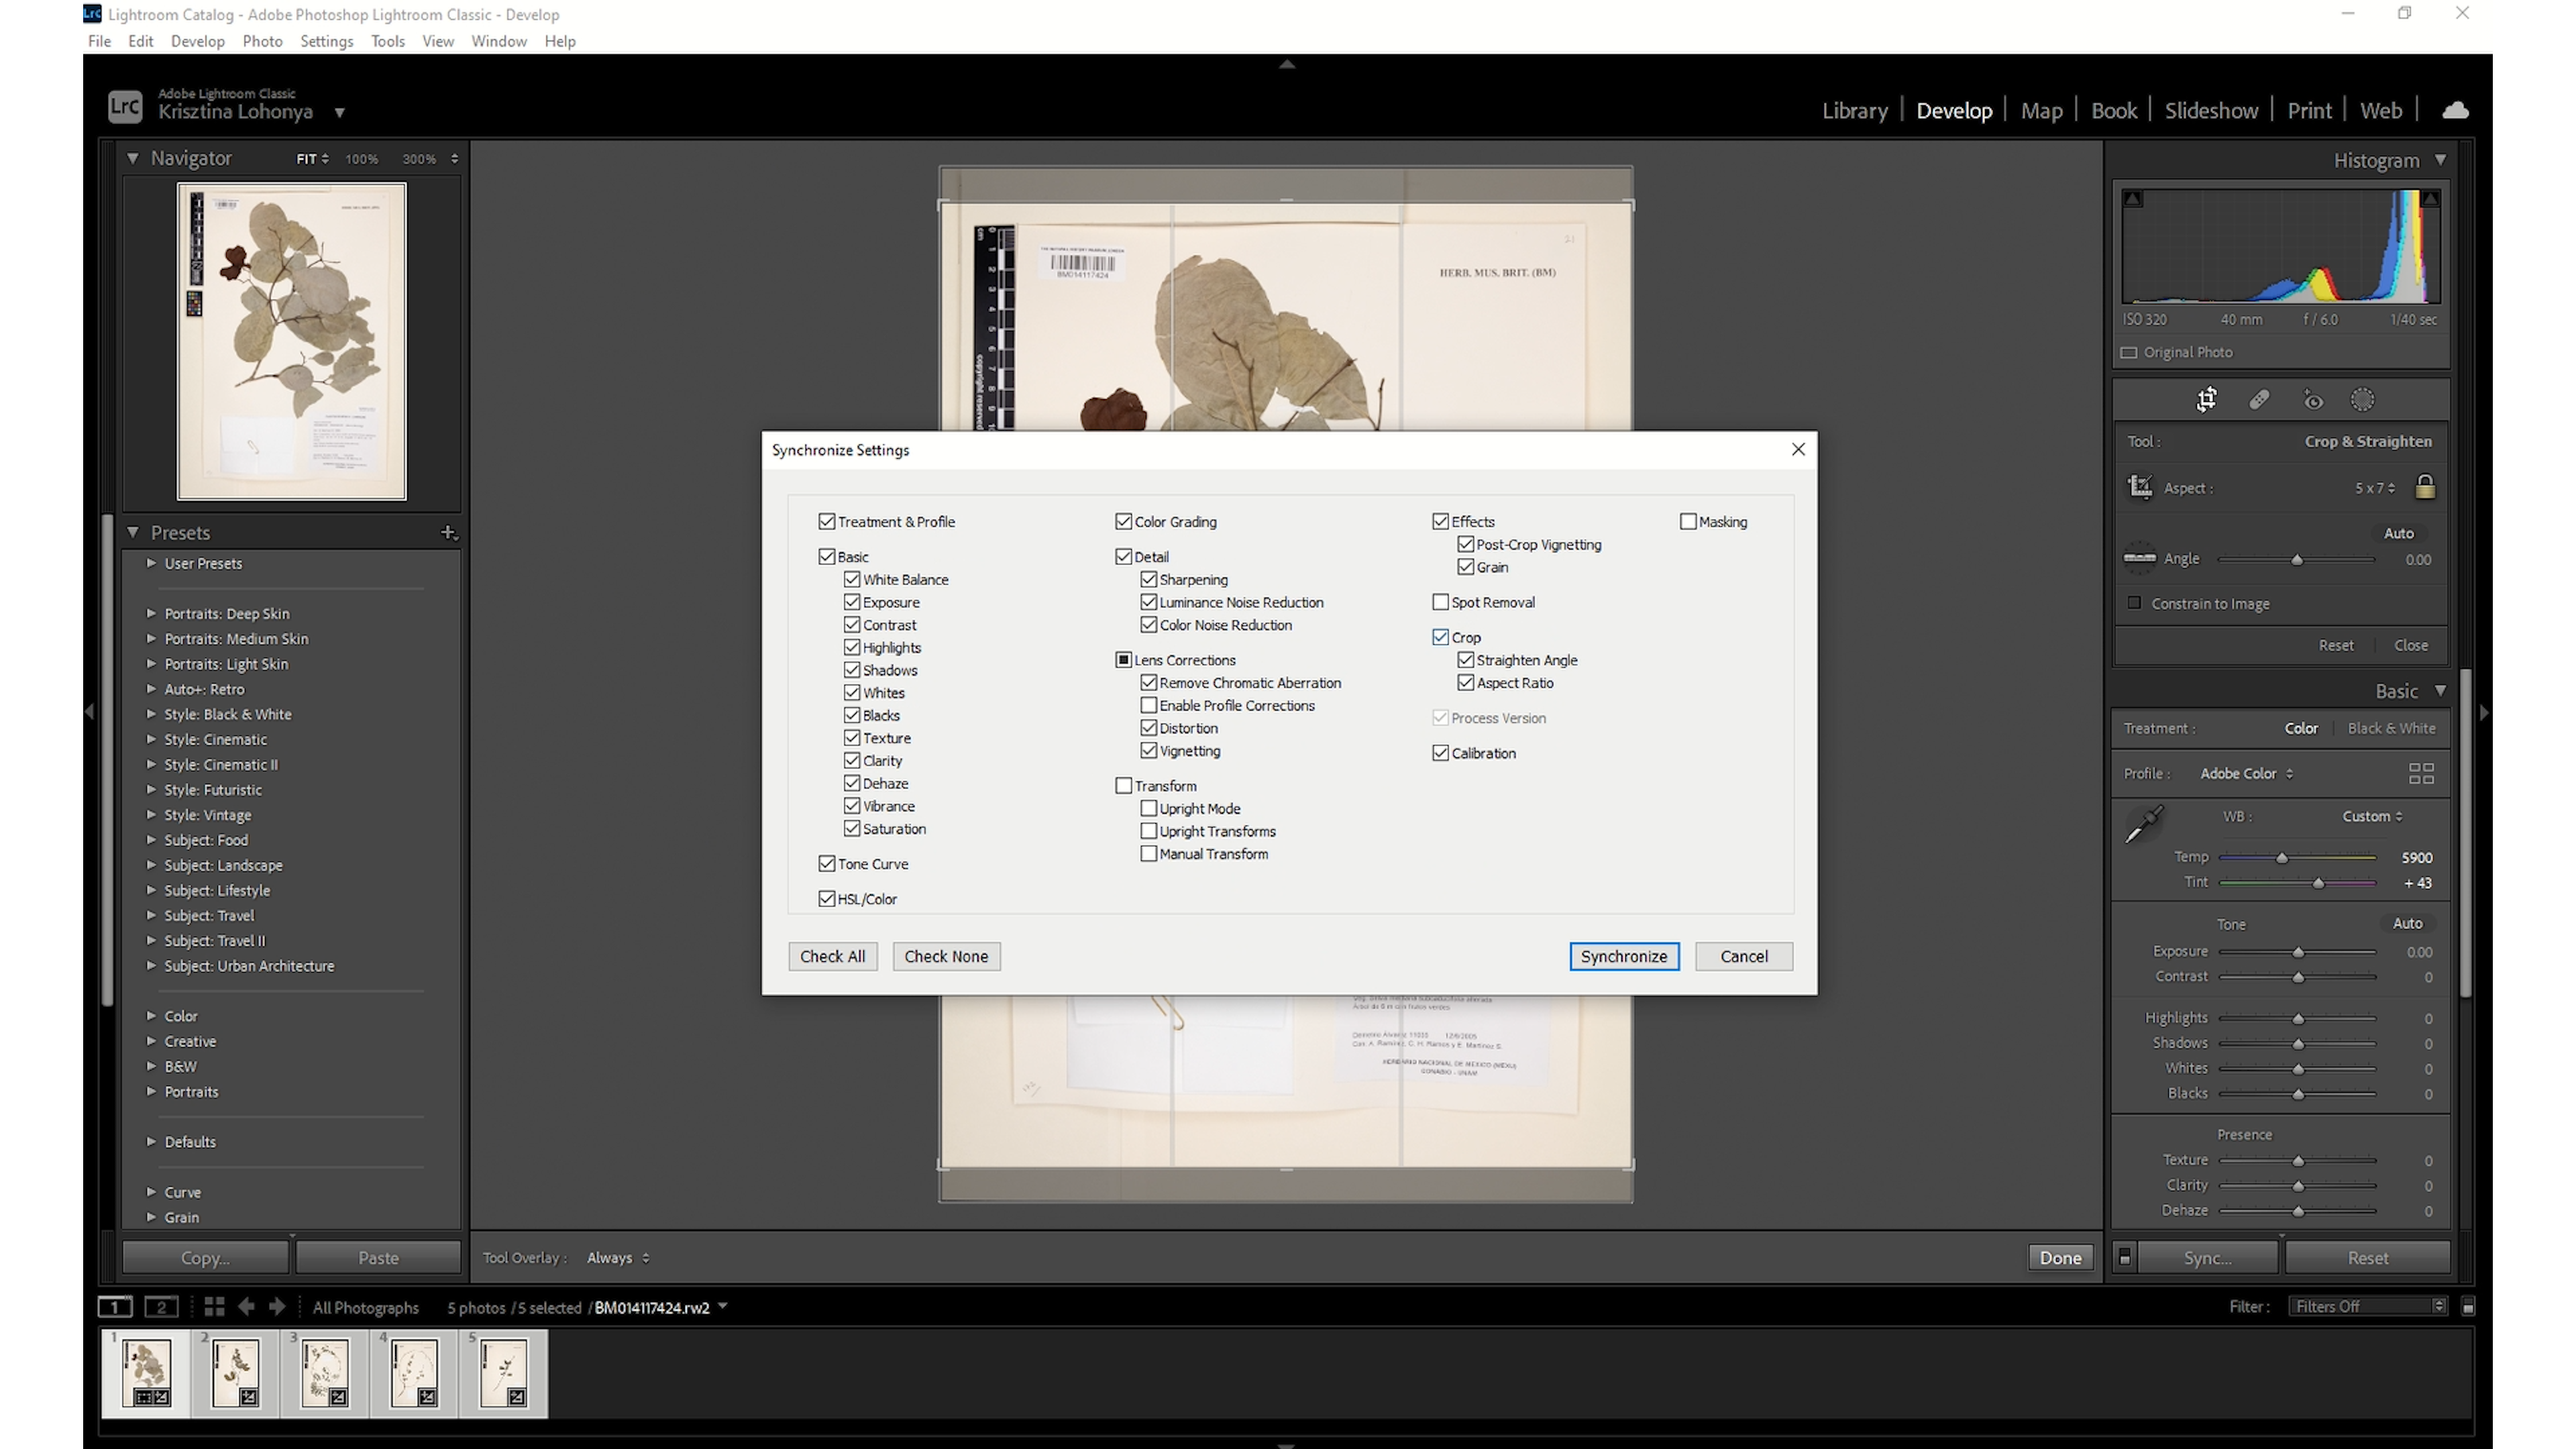 Figure 8
Tick the crop option in the right-hand column and make sure the two options below it are also ticked. Then press synchronize. This may take a while to complete.
Exporting The images are now ready to be exported.
To export, go to ‘File’ -> ‘Export’
A new window will open. A few more steps need to be completed here to ensure that the exported images are ready for publication.
The precise settings you chose will depend on your setup, but at the NHM we change the ‘Export Location’ details to:
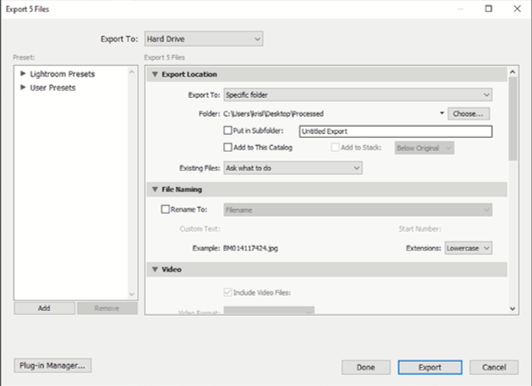 Figure 9
We then set our ‘File Settings’. We choose the options:
- Image format = TIFF
- Compression = None
- Colour Space = sRGB - most consisatnt colours between different screens.
- Bit Depth = 16 bits/component Additionally in ‘Image Sizing’ we set Resolution to 240 pixels per inch.
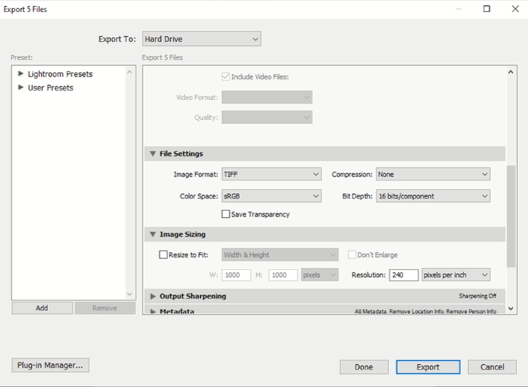
Figure 10: Export window with settings.
Once this is done, we check over all the options and click export. This step can take some time so we often run this overnight.
Authors
Michael Jardine
Contributors
This work is built upon the working practices of the NHM staff.
Licence
The content of this workflow is the property of the Trustees of the Natural History Museum and may be used under a creative commons licence